Stonebridge Golf Club was designed by renowned golf course architect Arthur Hills. Hills’ designs are synonymous with courses that are beautiful, fun to play, and classic in their character and strategy. Each hole is designed to test your strategy and skill while providing stunning views. The golf course rivals private course conditions with extraordinary upkeep from tee to green. Stonebridge has been consistently ranked among the best public golf courses in the area. Whether you’re here for a casual round or competitive play, Stonebridge Golf Club offers a memorable experience for all.
tee options
We have a variety of tee options to make the course fun and challenging for every golf ability.
| Tee | Yardage | Rating | Slope |
|---|---|---|---|
| Blue | 6,932 | 74.2 | 131 |
| White | 6,481 | 71.5 | |
| Yellow | 6,044 | M: 69.7L: 75.4 | M: 125L:137 |
| Combo | 5,687 | ||
| Silver | 5,198 | M: 65.3L: 70.1 | M: 112L: 127 |
Hole by Hole Course Tour
Enjoy our hole by hole yardage guide pictures and take advantage of playing tips for each hole. Get a head start on course strategy with this helpful golf course information!
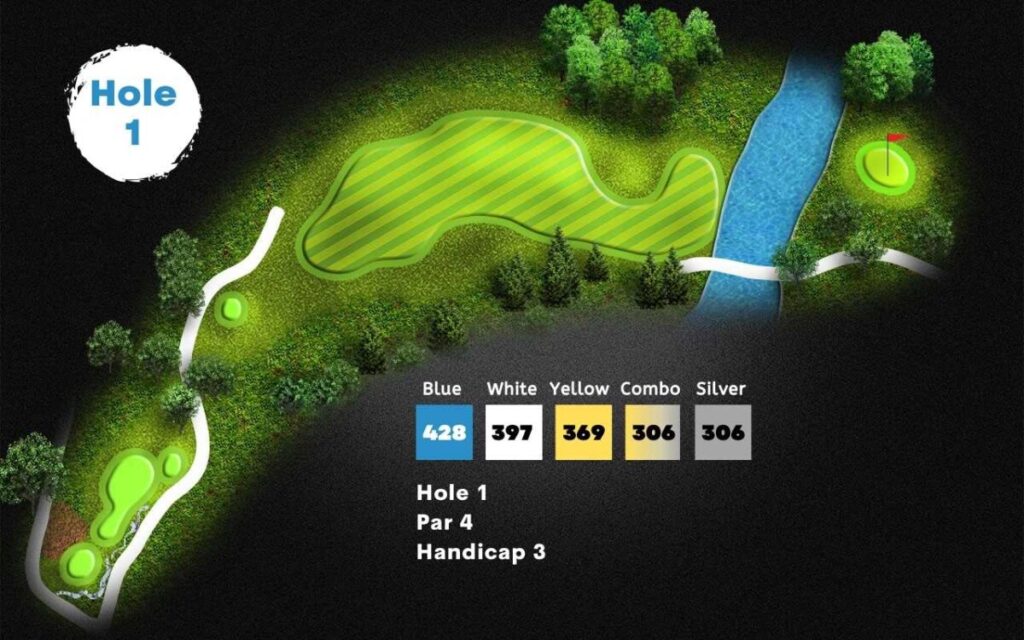
Hole 1
Par 4
For this dogleg right we recommend you aim toward the 150 yard marker. Water comes into play, 70 yards short of the green. Watch OB on the right side of the fairway, don’t cut the corner. The woods past the fairway are marked red hazard. This is the area of woods to the left of the #1 fairway and to the left of the #10 green. This green slopes back to front toward water and is a two tier green.
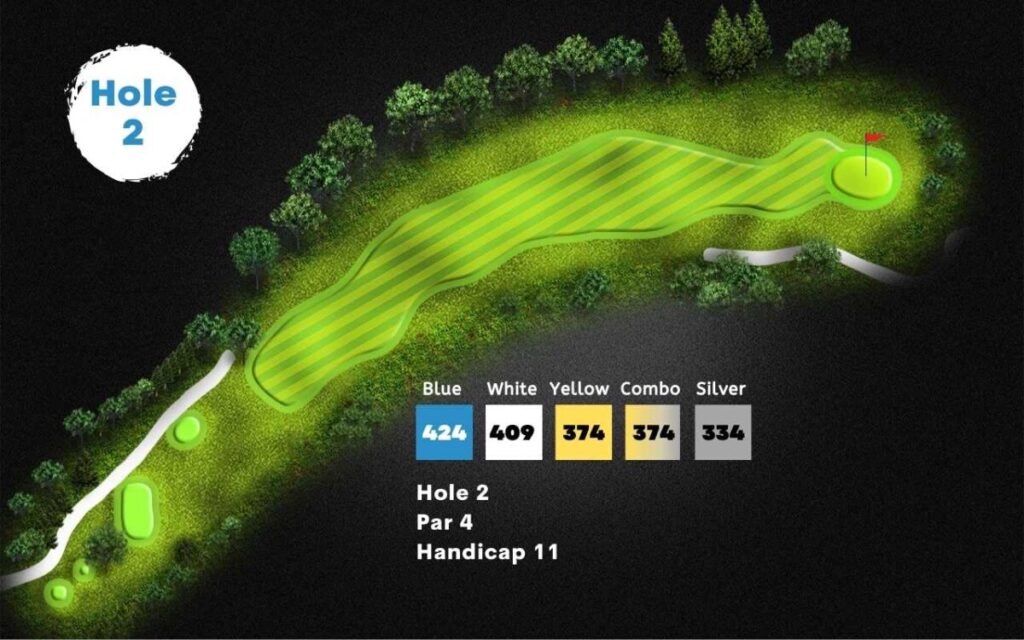
Hole 2
Par 4
This is a slight dogleg right with a blind tee shot. The pin and green are visible in the distance but the landing area is not visible from the tee. We suggest aiming for the two trees on right side of the fairway. A good drive will leave a shot inside 125 yards. Don’t cut too much off the corner, OB will come into play on right side This green slopes left to right.
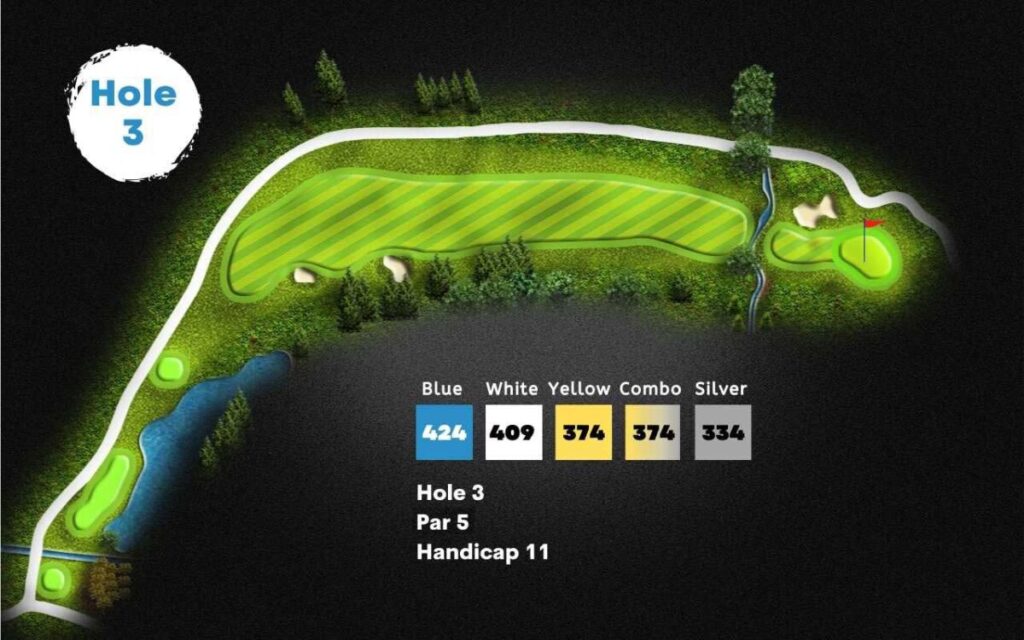
Hole 3
Par 5
This hole is a dogleg right. We suggest you aim for the two bunkers on the right side of the fairway, favor the right bunker. OB comes in play on both sides of this hole. Don’t need to cut off corner to much. A small creek is short of the green, 60 yards out. This green slopes back to front and is a two tier green.
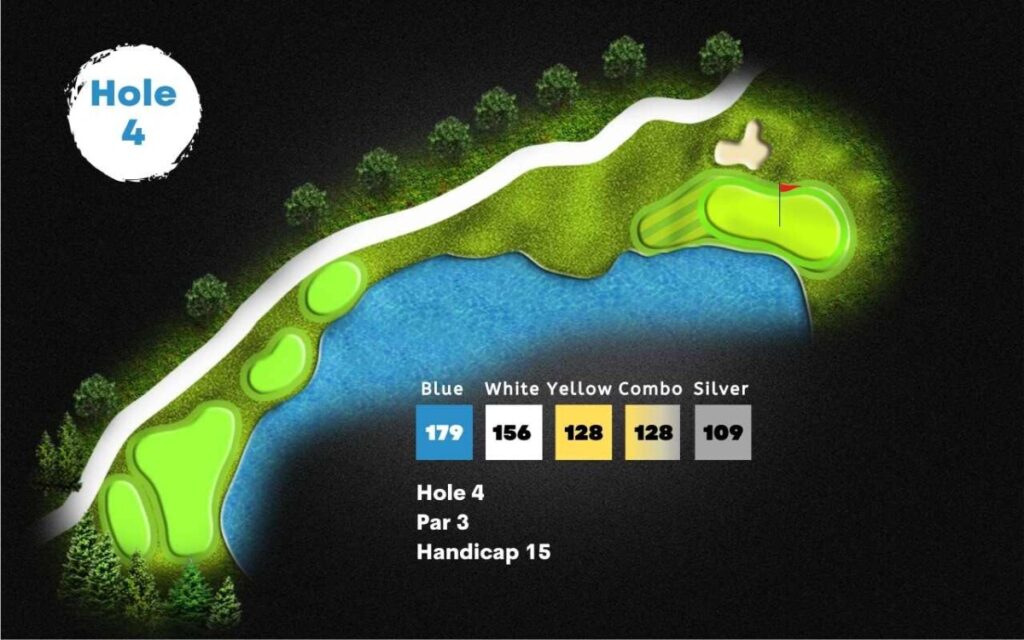
Hole 4
Par 3
For this hole aim to the bunker on the left side of the green and work the ball left to right. Water comes into play. The drop area is located in front of Red Tees. This green slopes left to right toward water.
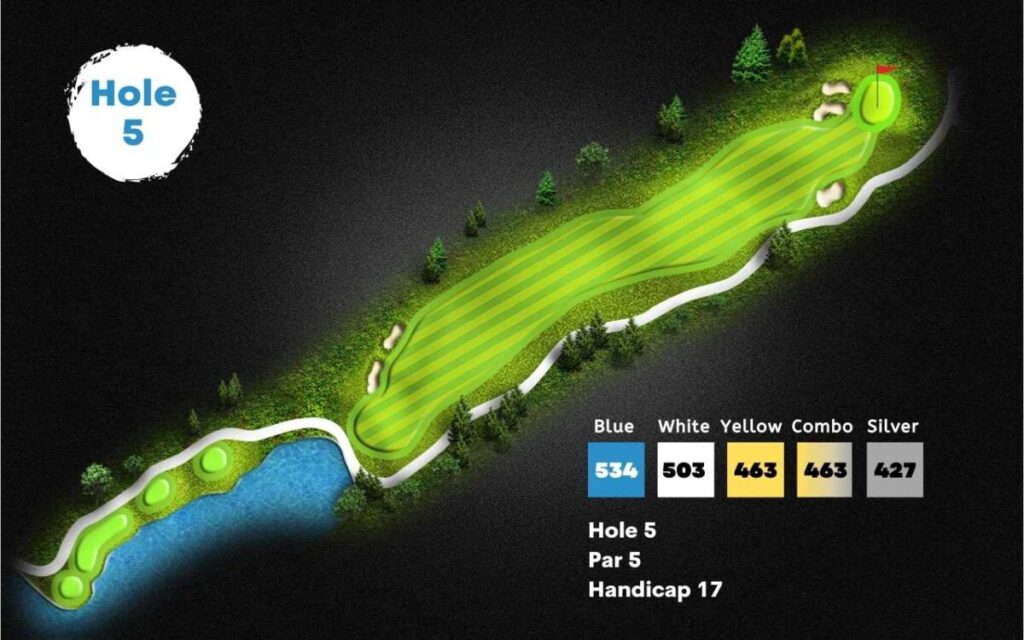
Hole 5
Par 5
This is a dead straight hole, bombs away. OB comes into play on both sides of the fairway. Aim toward the bunkers at the start of the fairway right off the tee. This green slopes back to front and is a two tier green.
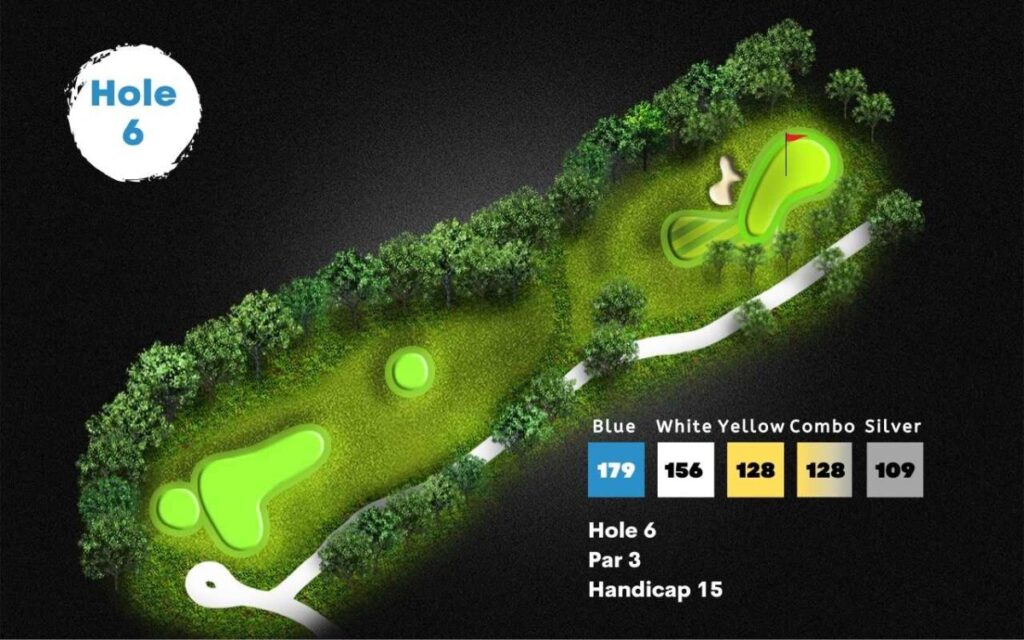
Hole 6
Par 3
This is our #1 handicap hole on the course. A tough hole, leaving your tee shot short, and right of the green, is a prime place to aim. This green slopes back to front.

Hole 7
Par 4
This is a dogleg left. We recommend a right to left ball flight. Aim at the 150 yard mark. OB on both sides of this fairway if you cut the corner too much off the tee. This green slopes right to left.
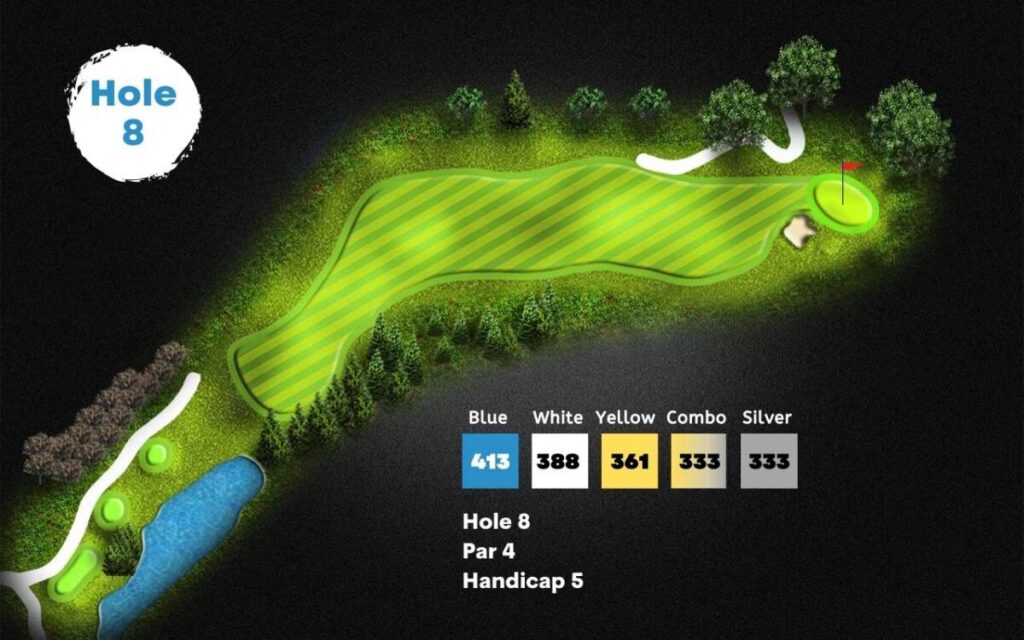
Hole 8
Par 4
This is a dogleg right. A left to right ball flight is recommended. Aim for the large rock straight out and the150 yardage stake. A large tree will block your second shot into green if your tee shot goes through the fairway. OB on both sides of the fairway will come into play if players cut corner to much off the tee. This green slopes left to right. A large bunker right of the green comes into play.
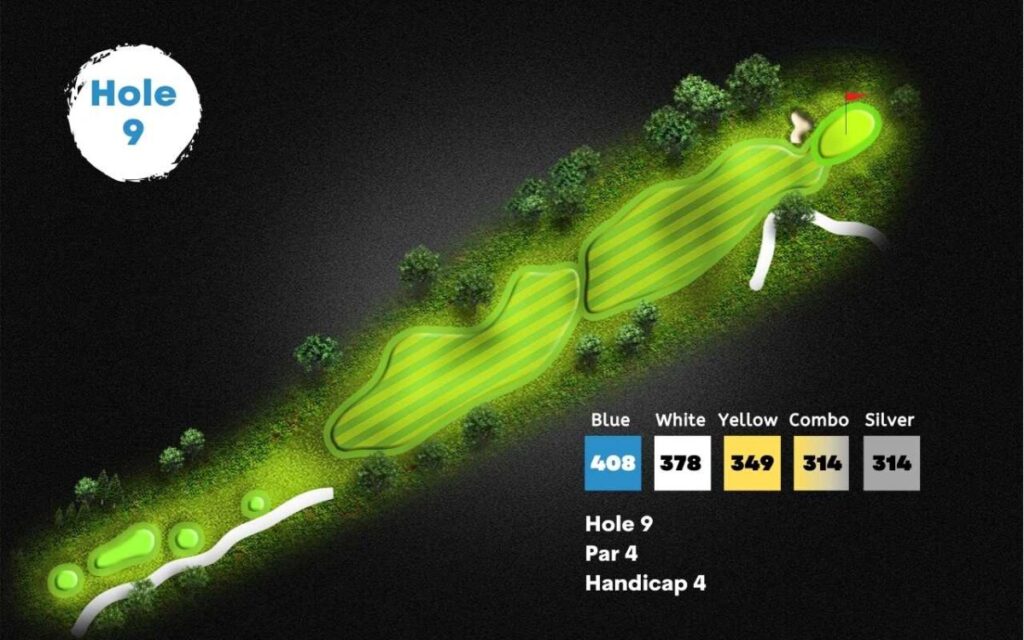
Hole 9
Par 4
This is a straight away par 4. The fairway drops to the lower fairway at the150 yardage marker. OB comes into play on the right side. A red hazard on the left side of the fairway from 170 to around the back of green. This green slopes right to left
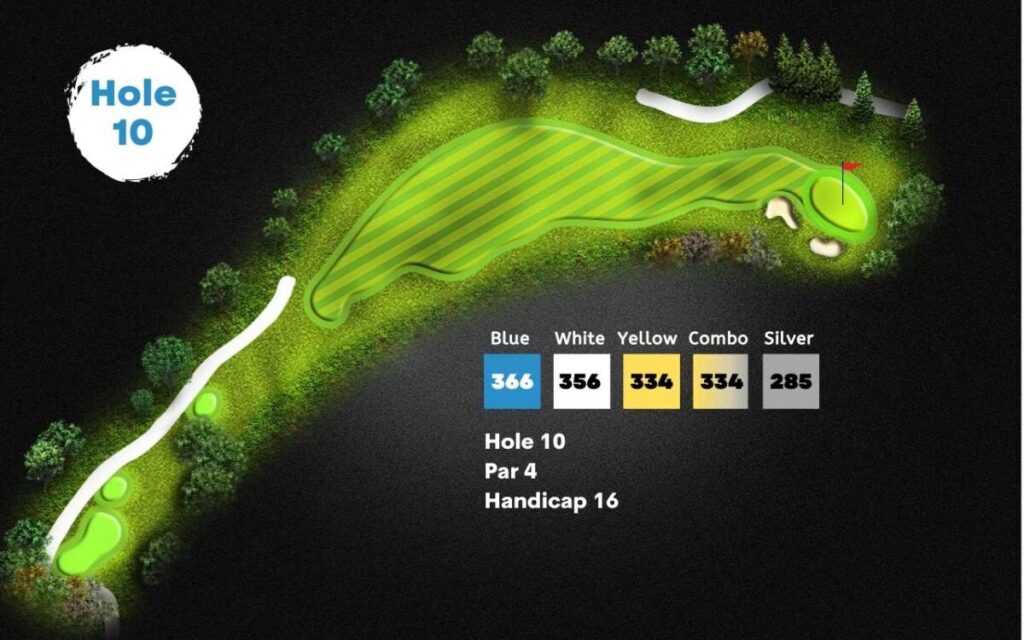
Hole 10
Par 4
This hole has a slight left to right tee shot. We suggest aiming at the 150 yard mark which will leave a short iron into the green. The Red stake hazard comes into play on the right side of the fairway. There is also OB on the left. The green slopes back to front and is a two tier green. Watch out for the large bunker left and short of the green.
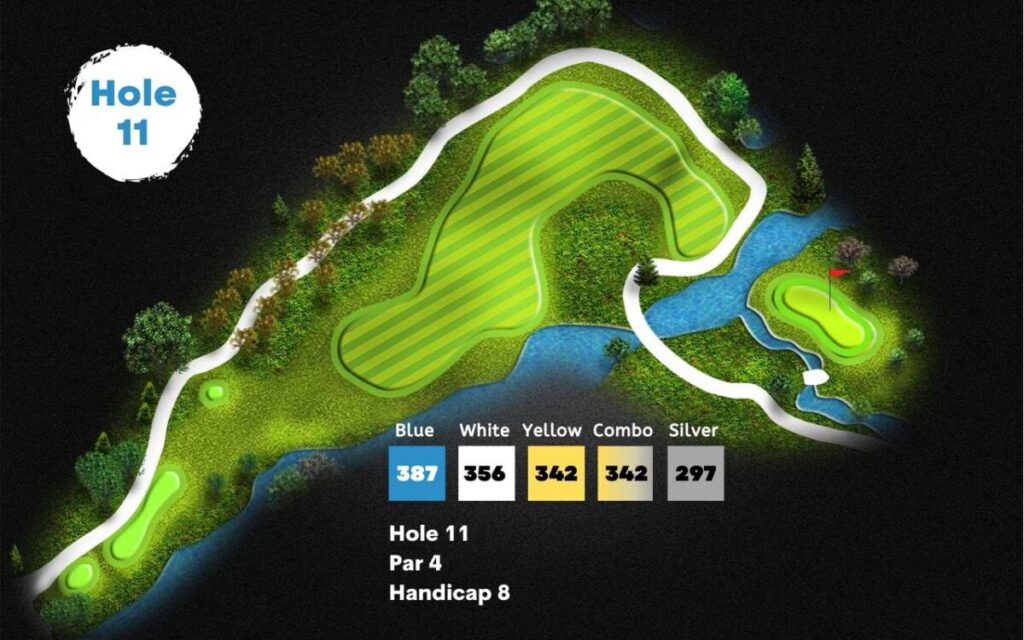
Hole 11
Par 4
This hole plays left to right. Aiming right of the 150 yard marker is a good strategy. It will leave you a short iron into the green. Water comes into play all the way from tee on right side of the fairway. Red and Yellow stakes cover this side of the hole. There is a small creek to the right of the green. This is one of our less sloped greens on the course and no bunkers to consider.
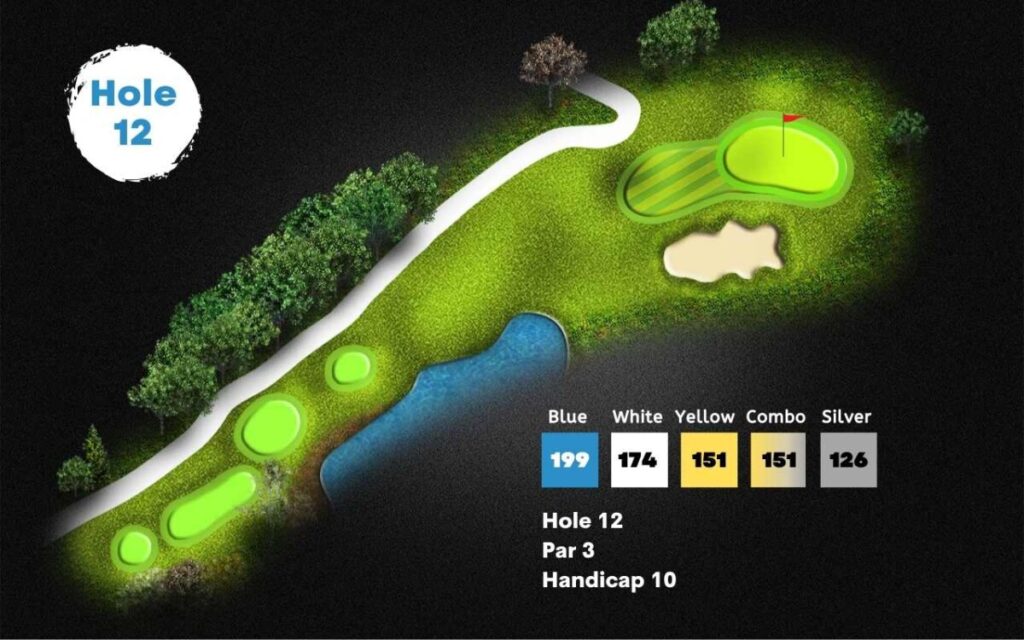
Hole 12
Par 3
Favor the left side of this green as the green slopes left to right. Landing area in front of green is good aiming point. There is a large bunker to the right of green. OB on left and right of this hole. Water hazard is way short of green, but poor tee shot will not carry.
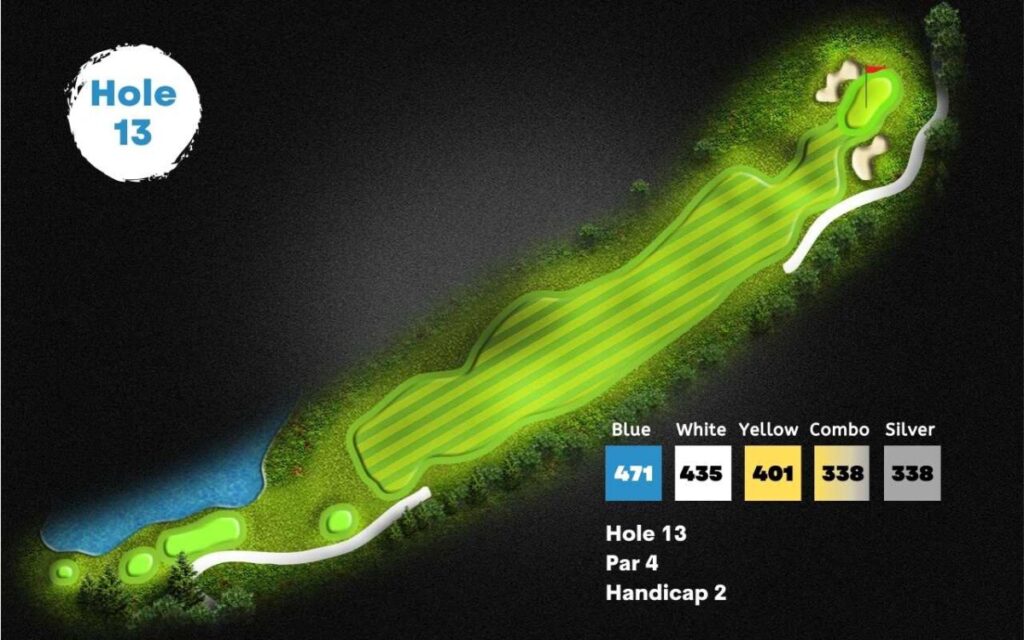
Hole 13
Par 4
This is a long straight forward hole. Favor the left side of the fairway, OB comes into play on right . Aim to the small trees on left side of the fairway. A good drive leaves your shot inside of 175 to this small green. There are bunkers left and right of green. This green slopes right to left with a large hump in middle of the green.
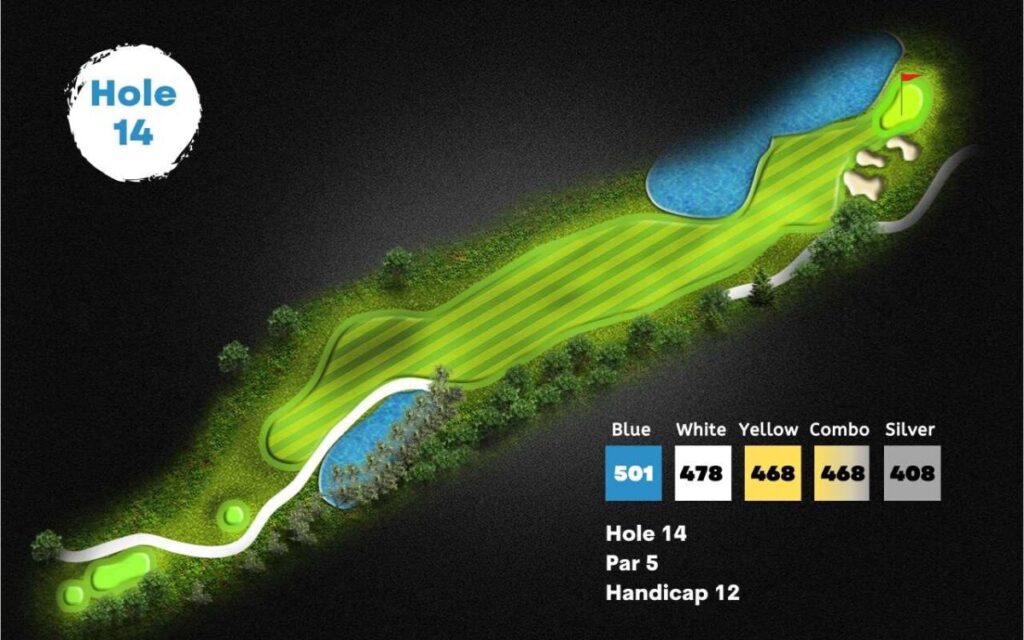
Hole 14
Par 5
This is a straight away par 5 with a small pond on the right as well as a larger one on the left side of the fairway from 125 yards to the green. Water comes into play on second shot, if going for the green. The aiming point will be small trees left of the fairway (toward hole 13). OB comes into play on right side, along with water hazard off tee. This green is a smaller green to hit in two. Bunkers guard this green on the right side. The green slopes right to left toward the water.
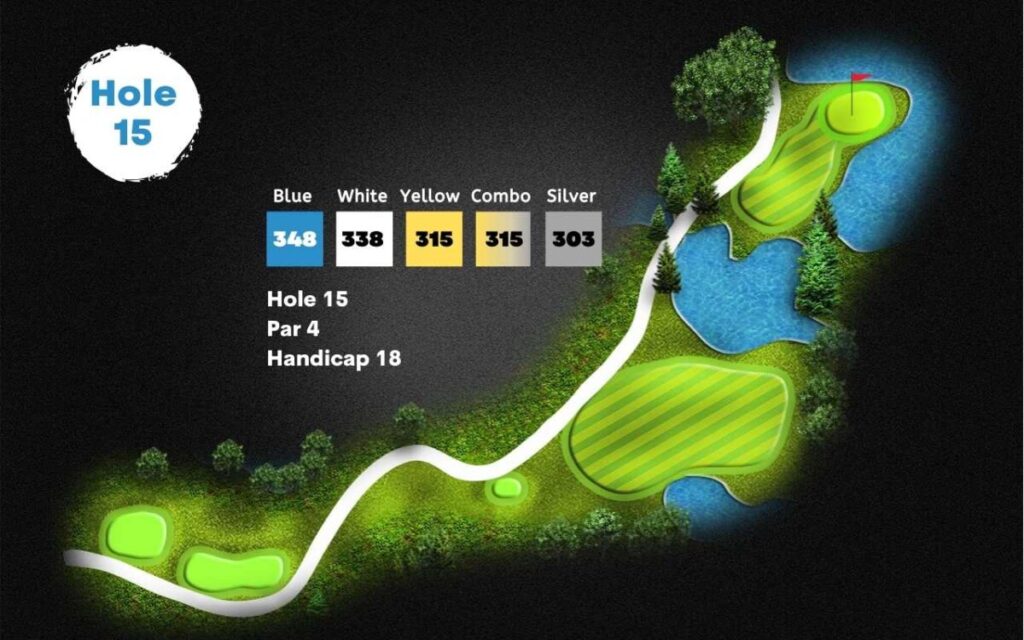
Hole 15
Par 4
This is a short par 4. We suggest aiming toward telephone poles in the distance. Then second shot will be over water. Water guards the hole on the backside of this green. Don’t go long or right. The green is fairly flat.
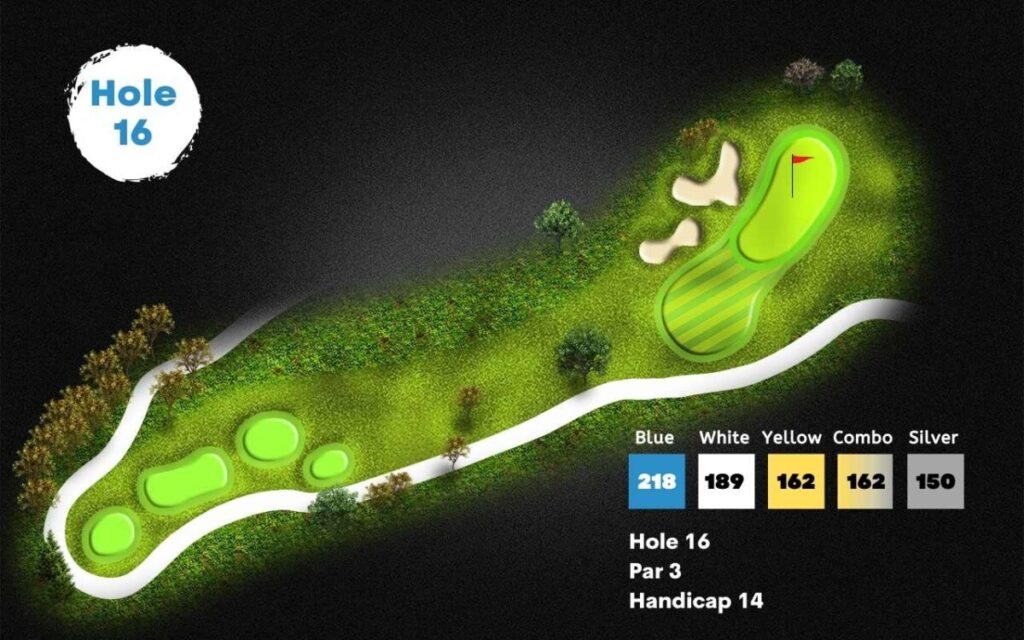
Hole 16
Par 3
This is a long par 3 with bunkers guarding the front of the green. OB comes into play right of green and road to left of green. The green is very large with a slope in the middle.
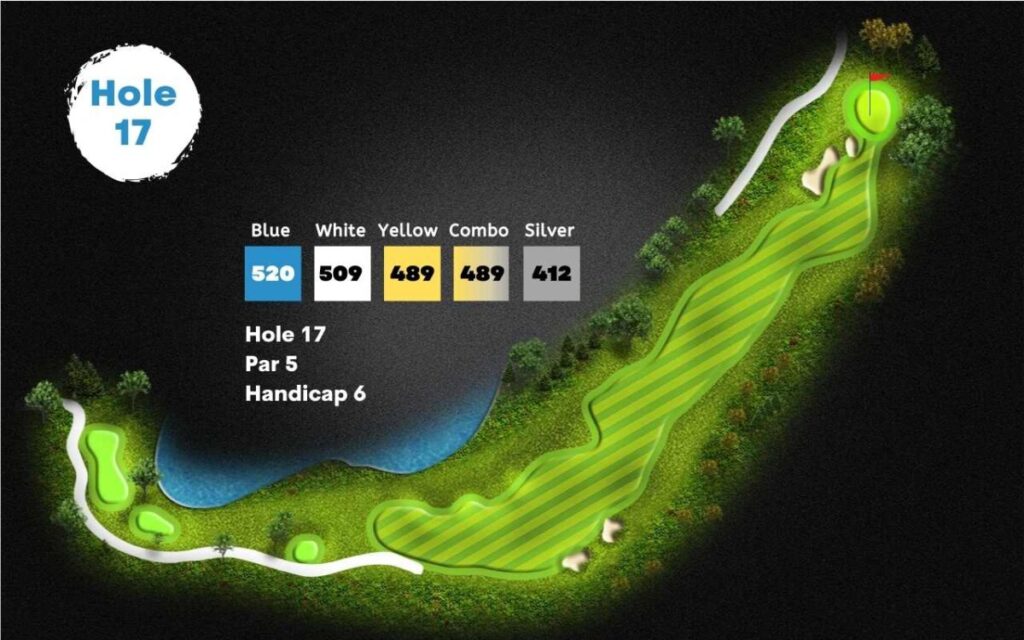
Hole 17
Par 5
This is a long par 5. OB and water come into play off the tee shot. Aiming Point should be two bunkers on the right side of the fairway. The second shot is a blind shot to a small green. A layup shot is recommended. Layup to 100 yards is a good play for this hole. The green is small and slopes front to back, with hazard behind the green. This is a hard green to hold from 200+ out. Bunkers guard the front of this green.
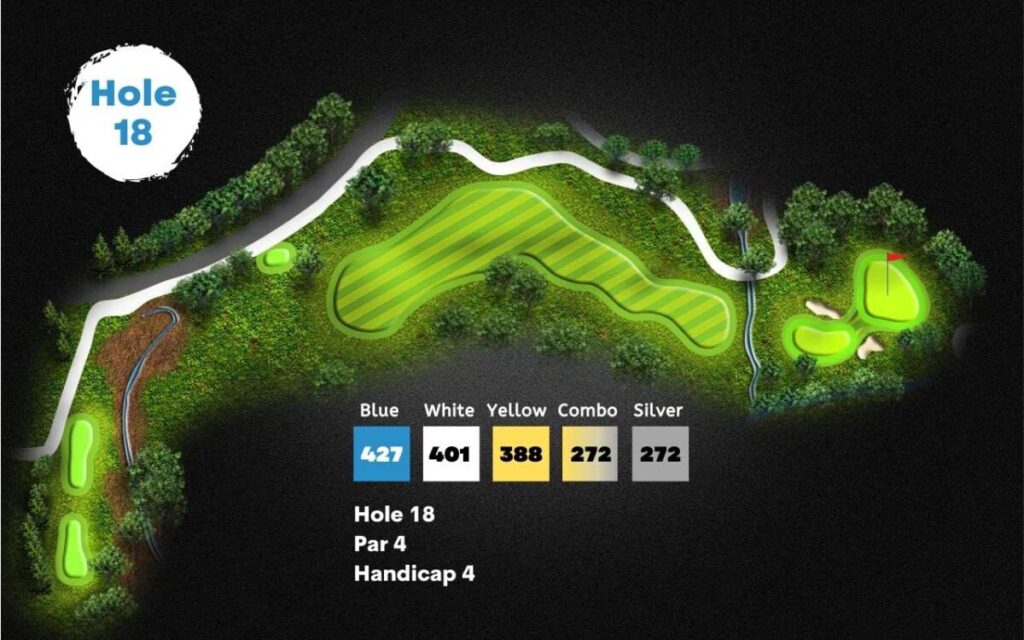
Hole 18
Par 4
This par 4 is a dogleg right. The large trees present an opportunity to loose your ball if you try to cut the corner on the right side. We suggest you aim for the 150 yard stake. A small creek, just short of the green and to right of green, a hazard does come into play with wayward shot. Hole 18 green is one of the tougher greens on our course. Slopes left to right toward creek. Bunkers protect left side of green and behind.
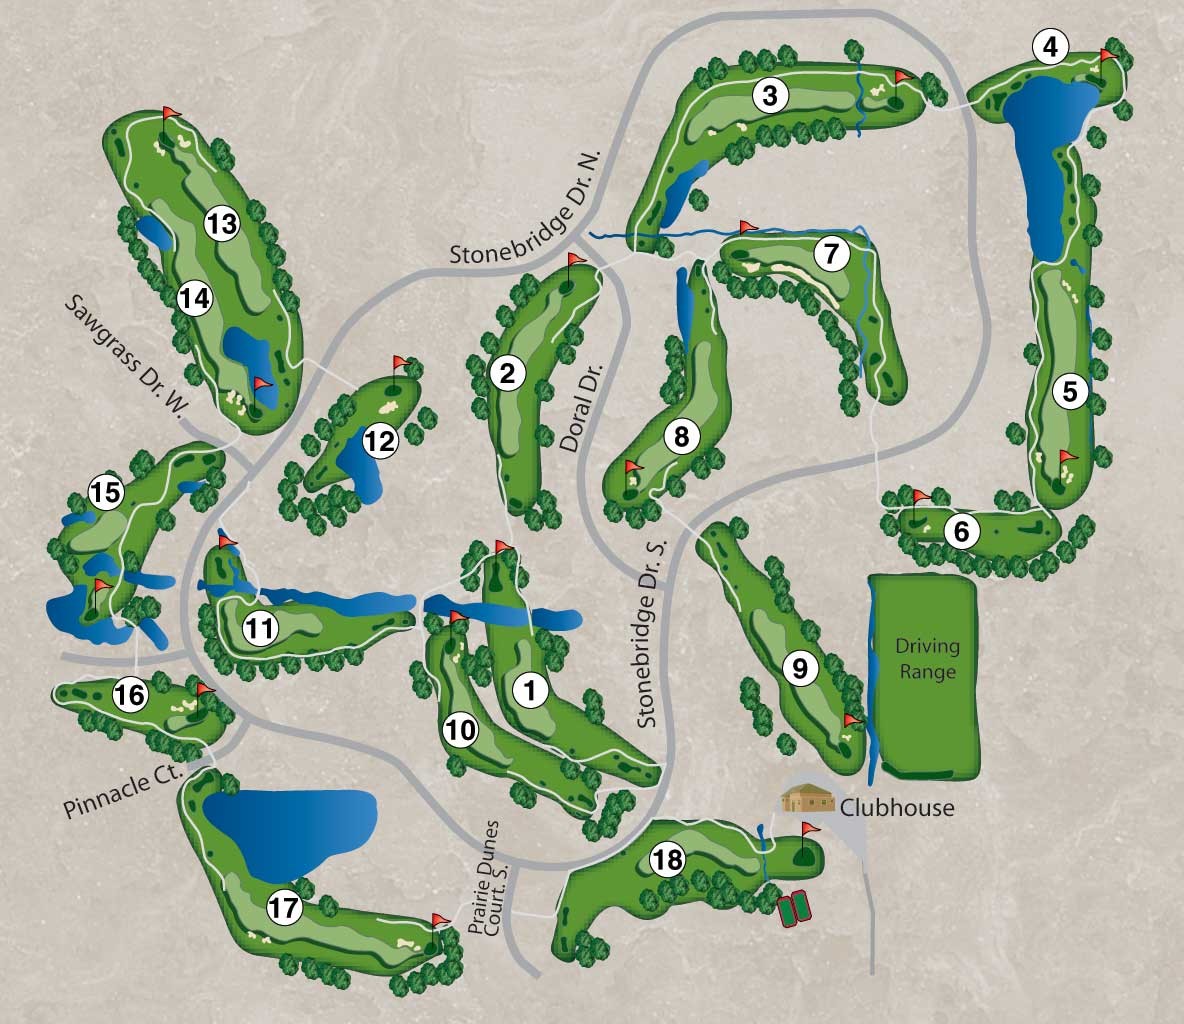
Course Layout